
Last Updated: 6/6/2024

The Elder Scrolls Online can be enjoyed solo, but it is also filled with your fellow adventurers. You can find information on how to interact with other players below.
Communicating with Other Players
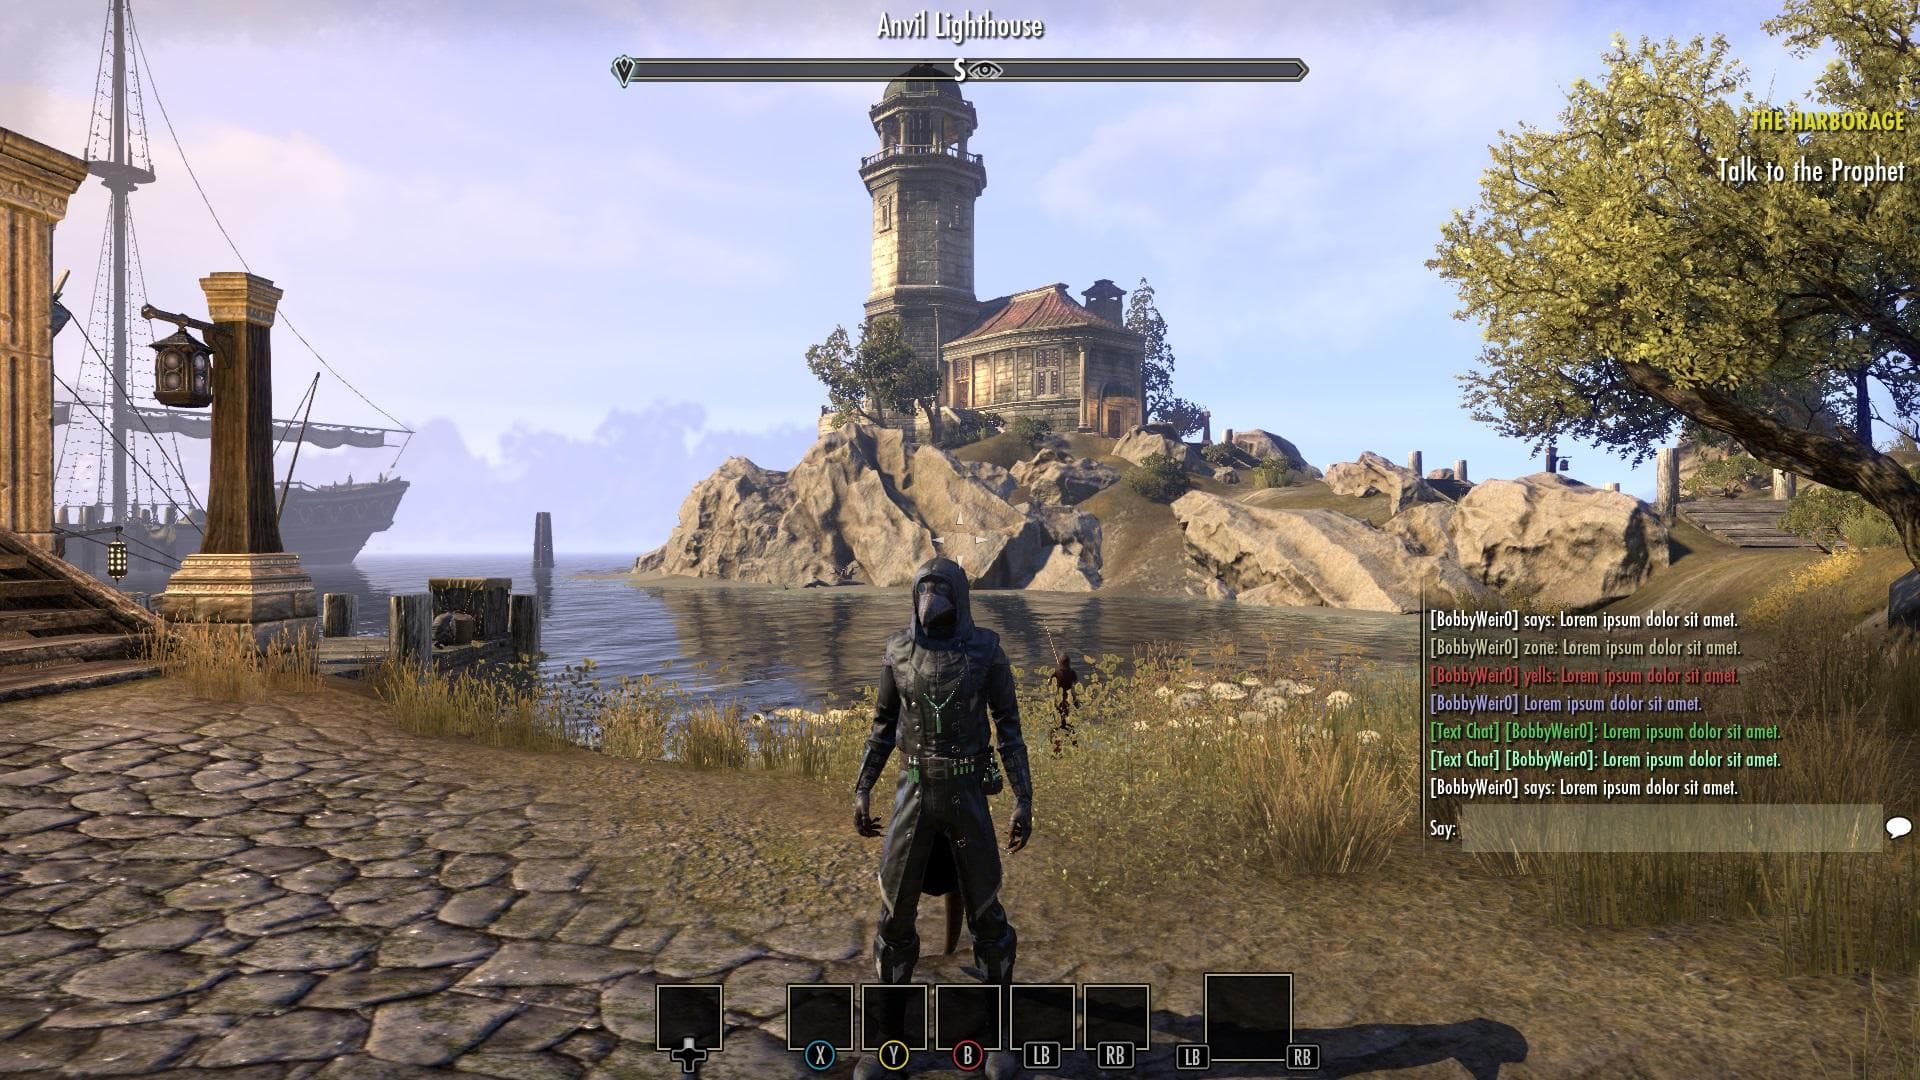
Chat Communication on PC/Mac
To open the chat window, press “Enter." From there, you can use various chat commands to communicate with other players. Here are some common chat commands:
- /say
sends a message to players in close proximity - /party
sends a message to players in your party - /zone
sends a message to all players in your current zone - /tell with "@UserID" or their character's name
sends a private chat message to the indicated player. - /guild 1 or /g1
sends a message to the first guild you've joined. If you join multiple guilds, you can use the numbers 2-5 to speak to your other guilds (ex. /guild 2 or /g2).
You can also perform a variety of emotes—fun animations that add flavor to your interactions with others. Try a /dance! Many emotes are available to you right away, with more available through systems such as Achievements, Daily Login Rewards, or the Crown Store.
There are several chat options you can access by clicking the gear icon in the upper-right of the chat window including locking the window, creating a new tab, and selecting which chat channels you see. You can find additional options within the Social Settings menu.
Chat Communication on Console
Text chat on console is off by default, but can be enabled a few different ways. If you already have a keyboard connected, you can simply press "Enter" to open the text chat HUD. Alternatively, you can press the Menu and Map buttons on your controller simultaneously. You can also go to the Social settings menu to turn the HUD chat display on (and you'll find options to change the text size and profanity filter here, too!).
Voice Chat Communication on Console
Voice chat can be accessed by accessing Main Menu, then Social , and finally Voice Chat. There are three types of channels:
- Area: Open to everyone within a certain distance of you. You are automatically added to this channel upon your first login.
- Group: Only open to members of your group.
- Guild: Only open to members of your guild. Guilds have six sub channels - one for officers, and five for other members of the guild.
Quick Chat & Emotes
Quick chat and emotes are a way to quickly message other players around you. You can open the Quick Chat and Emote Menu by navigating to Main Menu, then Social, and Emotes. From here, you can select the quick chat or emote you wish to use.
While playing the game, press and hold right on the D-pad to open the emote quickslot for emotes and quick chat.
Forming a Party
Many of Tamriel's dangers require a group to overcome. Below are the steps to invite another player to your party:
PC/Mac
- Open the chat window by pressing “Enter"
- Type /invite and the player name
- Press “Enter"
The player will then be prompted to join your party.
You can also invite a character that is nearby by approaching them and pressing “F" to bring up the interaction radial menu. Incoming party requests appear as a small, glowing chat bubble icon in your chat window.
Xbox
- Approach the player
- Hold down the "Menu" button
- Use the left stick to choose “Invite"
The player will then be prompted to join your party.
PlayStation®
- Approach the player
- Hold down the "Options" button
- Use LS to choose “Invite"
The player will then be prompted to join your party.
Interacting with Others (interaction wheel)
Using the interaction wheel, you can perform several interactions with your fellow players, including:
- Challenge them to a duel
- Initiate a trade
- Invite them to a group
- Report them
- Send them a whisper
- Add them as a friend
To open the interaction wheel on PC/Mac, press and hold “F" while targeting the player and make your selection.
To open the interaction wheel on consoles, press and hold the " Menu" button if on Xbox or the "Options" button if on PlayStation® while targeting the player and make your selection.
Group & Activity Finder System
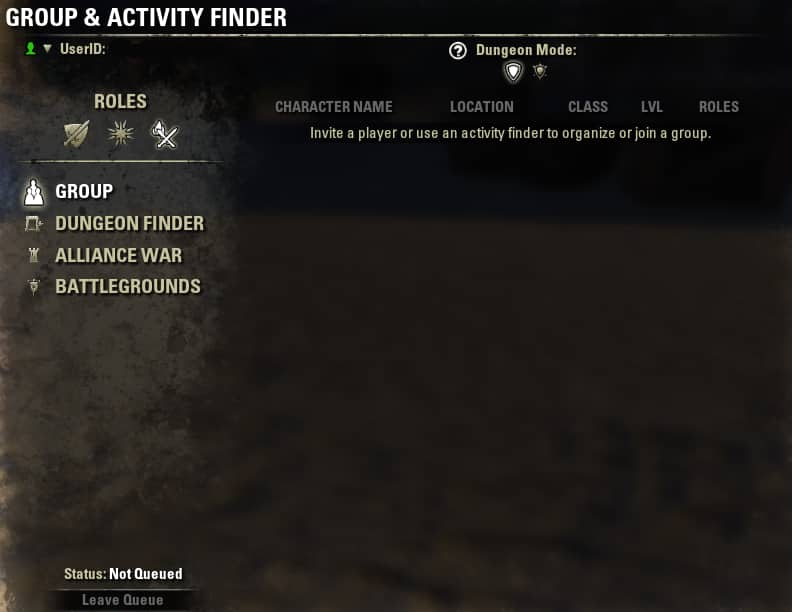
The Group & Activity Finder tool can assist you in finding other players to join with.
To access the tool on PC/Mac:
- Press “P" to open the group menu.
- Select your role.
- Select your activity type.
- Select "Join Queue".
To access this tool on console, navigate to Main Menu, then Social, and finally Group.
Once you're grouped, you can use a Wayshrine or the “Travel to Player" function options to join up (unless your group mates are in an AvA area).
When selecting an activity type, you can choose between creating a simple Group, joining a Dungeon Finder group (allowing you to queue for specific dungeons), joining an Alliance War group, or joining a Battleground group. Note that you must be in an an AvA area to queue for an Alliance War group.
The tool also allows you to set your desired group role: Tank, Damage, or Healer. If queing for a Dungeon, you also have the option to select Normal or Veteran mode.
Group Finder & Custom Groups
In addition to finding matchmade groups through the Activity Finder as described above, you can also create or search for a group with the Group Finder.
PC/Mac
To create a group with Group Finder:
- Press “P” to open the group menu.
- Select “Group Finder” on the lefthand side.
- Select the activity for which you wish to create a group.
- Hit “Create.”
- Fill out information including number of players, group title, and any additional details such as Champion Point minimums or required roles.
- Hit “Create” once more.
- You must now wait for players to apply to join your group. If you have enabled auto-accept, they will be added automatically. Otherwise, you will need to approve requests to join.
- Once your group has been made, you will need to enter the activity as normal.
To join a group with Group Finder:
- Press “P” to open the group menu.
- Select “Group Finder" on the lefthand side.
- Select the activity for which you wish to join a group.
- A list of groups created by other players should be displayed. You can narrow or widen your results by applying filters to your search, such as the specific subset of the activity you wish to do. For example, when selecting Dungeons as your activity, you can filter for Normal or Veteran mode, or for a specific dungeon such as Tempest Island, Vaults of Madness, or a random dungeon.
- Select a group that matches your desired goals and apply by selecting “Join.” You may need to wait for the group leader to accept your application to join.
- Once the group leader has filled out the group, you will need to enter the activity as normal.
Xbox
To create a group with Group Finder:
- Navigate to the Main Menu, then Activity Finder, and then Group Finder.
- Select “Create Group.”
- Fill out information including number of players, group title, and any additional details such as Champion Point minimums or required roles.
- Select “Create Group” once more.
- You must now wait for players to apply to join your group. If you have enabled auto-accept, they will be added automatically. Otherwise, you will need to approve requests to join.
- Once your group has been made, you will need to enter the activity as normal.
To join a group with Group Finder:
- Navigate to the Main Menu, then Activity Finder, and then Group Finder.
- Select “Find Group.”
- A list of groups created by other players should be displayed. You can narrow or widen your results by applying filters to your search, such as the specific subset of the activity you wish to do. For example, when selecting Dungeons as your activity, you can filter for Normal or Veteran mode, or for a specific dungeon such as Tempest Island, Vaults of Madness, or a random dungeon.
- Select a group that matches your desired goals and apply by selecting “Join.” You may need to wait for the group leader to accept your application to join.
- Once the group leader has filled out the group, you will need to enter the activity as normal.
Playstation®
To create a group with Group Finder:
- Navigate to the Main Menu, then Activity Finder, and then Group Finder.
- Select “Create Group.”
- Fill out information including number of players, group title, and any additional details such as Champion Point minimums or required roles.
- Select “Create Group” once more.
- You must now wait for players to apply to join your group. If you have enabled auto-accept, they will be added automatically. Otherwise, you will need to approve requests to join.
- Once your group has been made, you will need to enter the activity as normal.
To join a group with Group Finder:
- Navigate to the Main Menu, then Activity Finder, and then Group Finder.
- Select “Find Group.”
- A list of groups created by other players should be displayed. You can narrow or widen your results by applying filters to your search, such as the specific subset of the activity you wish to do. For example, when selecting Dungeons as your activity, you can filter for Normal or Veteran mode, or for a specific dungeon such as Tempest Island, Vaults of Madness, or a random dungeon.
- Select a group that matches your desired goals and apply by selecting “Join.” You may need to wait for the group leader to accept your application to join.
- Once the group leader has filled out the group, you will need to enter the activity as normal.
Travel to Player
You can travel to anyone that's in your group, guild, or contacts list, regardless of the zone they're in! To do this, select their name in the Contacts, Group, or Guild Menu, then select Travel to Player. This will place you at the nearest Wayshrine to that player.
Note that you cannot enter or leave Cyrodiil (Alliance War) by using the Travel to Player function.
Adding Friends
Your friends list helps you keep track of players you like to socialize with in-game. To add a friend:
PC/Mac
- Open the Contacts Menu
- Press “E" to open the “Add Friend" dialog
- Enter your friend's character name or UserID
- (Optional) enter a message to send your friend
- Hit “Request"
You can also send friend requests by right-clicking a character's name in chat, or by aiming at them and pressing “F" to activate the interaction menu (if they're close by).
Xbox
On Xbox, your friends list helps you keep track of players that you like to socialize with in-game. To add a friend, use your Xbox system or send friend requests by holding down "Menu" button while targeting a player and choosing "Add As Friend" with the left stick.
PlayStation®
On PlayStation®, your friends list helps you keep track of players that you like to socialize with in-game. To add a friend, you can use your PS system or send friend requests by holding down "Options" button while targeting a player and choosing "Add As Friend" with the left stick.
Forming a Guild
Guilds allow large groups of players to organize, coordinate, and socialize. They each have their own private chat channel and several other benefits which include:
- Guild Banks, available after your Guild reaches 10 players, and accessible through Bankers in large cities
- Guild Stores, available after your Guild reaches 50 players, and allows guild members to buy items from other guild members in addition to posting items for sale
- Guild Traders, public outlets for Guild stores that can be bid on and purchased each week
To form a Guild:
PC/Mac
- Open the Guilds Menu
- Press “E" to create your guild
- Enter your desired guild name
- Select your Guild's alliance for the Alliance War
- Choose “Create Guild"
You can invite other players to join your guild by selecting the “Roster" section of the Guild menu and pressing “E" to add a member by their character name or UserID.
Xbox
- Open the Social Menu
- Go to Guilds
- Select Create New Guild
- Select your Guild's alliance for the Alliance War
- Enter your desired Guild name
- Select Finish
You can invite other players to join your guild by selecting the Roster section of the Guild Menu and pressing "X" to add a member by their gamertag.
PlayStation®
- Open the Social Menu
- Go to Guilds
- Select Create New Guild
- Select your Guild's alliance for the Alliance War
- Enter your desired Guild name
- Select Finish
You can invite other players to join your Guild by selecting the Roster section of the Guild Menu and pressing the "Square" button to add a member by their online ID.
Joining a Guild
If you're invited to join a Guild, you'll receive a notification that allows you to accept or decline the invitation. Easy!
If you're having trouble finding a Guild to join, ask your fellow players in the area chat or check out the Guild Recruitment section on the official forums, or use the Guild Finder tool in your Guilds menu.
Guild Finder
To use the Guild Finder to join a guild:
PC/Mac
- Press “G” to open the guilds menu.
- Select “Guild Finder” from the dropdown menu at the top.
- Select “Browse Guilds” and choose a category.
- A list of guilds that fit your filter should be displayed. Highlight one that fits your interests and select ”View Guild Info.”
- If the Guild matches what you are looking for, choose “Apply to Guild.” You will need to wait for a Guild member with appropriate permissions to approve your application.
Xbox
- Navigate to the Main Menu, then Social, then Guilds.
- Select the Guild Finder.
- Select “Browse Guilds” and choose a category.
- A list of guilds that fit your filter should be displayed. Highlight one that fits your interests and select ”View Guild Info.”
- If the Guild matches what you are looking for, choose “Apply to Guild.” You will need to wait for a Guild member with appropriate permissions to approve your application.
PlayStation®
- Navigate to the Main Menu, then Social, then Guilds.
- Select the Guild Finder.
- Select “Browse Guilds” and choose a category.
- A list of guilds that fit your filter should be displayed. Highlight one that fits your interests and select ”View Guild Info.”
- If the Guild matches what you are looking for, choose “Apply to Guild.” You will need to wait for a Guild member with appropriate permissions to approve your application.
Don't forget that if you ever have additional gameplay questions, you should navigate to the in-game Help menu for more information on the game's features and mechanics. In addition, you can visit the Players Helping Players section in the official ESO forums to talk to the ESO community or check out any of the player-made guides right here.
Guides
Guides

Getting Started
- New Player Guide: Getting Started Part 1
- New Player Guide: Getting Started Part 3
- New Player Guide: Getting Started Part 2
- 10 New Player Tips for The Elder Scrolls Online
The Basics
- Antiquities System: Basics Guide FAQ
- New Player Guide: Controls and Keybindings
- New Player Guide: Character Creation
- New Player Guide: Combat Basics
- New Player Guide: Questing & Exploration
- Dungeons Guide: The Basics
- Imperial City Guide: The Basics
- Homestead: Basics Guide
- Clockwork City – Introducing Transmutation
Character Management
- New Player Guide: Inventory & Items
- New Player Guide: Skills & Leveling Up
- New Player Guide: Chat & Grouping
- Update 11 Guide: Costume Dyes
- Outfit System: Basics Guide
Activities
- New Player Guide: Group PvE Challenges
- New Player Guide: Gathering & Crafting
- New Player Guide: Player vs Player Challenges
- Your Guide to Dueling in ESO
- Homestead: Basics Guide
- Homestead Guide: Housing Editor & Home Decorating
Advanced Guides
- Guide to Event Tickets & Rewards
- Check out Jewelry Crafting With this Preview & Guide
- Homestead Guide: Housing Editor & Home Decorating
- Homestead Guide: Furnishing Crafting FAQ
- Homestead Guide: Master Writs
- Orsinium Guide: Maelstrom Arena
- Imperial City Guide: Tel Var Stones
- The Imperial City Guide: The Basics
Community Guides
- Community Guides–Flames of Ambition & Update 29
- Community Guides – Markarth & U28 Special
- Community Guides—Stonethorn & Update 27 Special
- Community Guides – Greymoor & Update 26 Special
- ESO Community Guides—New Player Special
- Community Guides – Harrowstorm & Update 25 Special
- ESO Community Guides—Dragonhold Special
- ESO Community Guides – September 2019
- Community Guides—Scalebreaker Special
- ESO Community Guides – July 2019
- ESO Community Guides – June 2019
- Community Guides – Elsweyr & Update 22 Special
- ESO Community Guides – Wrathstone Special
- ESO Community Guides – January 2019
- ESO Community Guides – November 2018